Tile Mapping Primer
This primer contains a lot of text. Although it is strongly recommended to read through it and play around with all the functions and options it is also useful to watch corresponding Online Video Tutorials.Also be sure to get yourself ready to know where you want to use tiles and how to do that basically, e.g. in connection with a game authoring system or game engine. This primer assumes that you already have a basic knowledge about how to handle your tiles.
Tile mapping is a common technique to define graphic objects to be used to layout and design game levels. Assume that you want to create a jump 'n run game. Then you will create a world for every game level using a limited number of graphic objects that are used to build backgrounds, foregrounds or solid ground areas where the game characters walk around. You could draw such worlds as a giant bitmap but storing this image data would take too much memory. Also, it would not be convenient concerning objects that are repeatedly displayed. You would have to update all instances of them once you apply a change somewhere.
Instead such game levels are divided into smaller tiles, e.g. 8x8 or 16x16 pixels and every world is defined by a map that just contains indexes into the set of tiles:
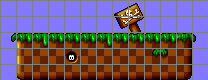

The example shows a simple piece of a level map with 35 tiles in a line and 5 tile rows where a single tile has a size of 16x16 pixels.
There are only 21 physically different of tiles in the tile set. So the tile map contains 175 entries using one of the 21 tiles of the tile set.
Phrases
There are different phrases concerning tile mapping techniques. Here is a short list of terms that are commonly used:tile... the small graphic item of fixed size used to build the tile maps. Common sizes are 8x8 or 16x16 pixels per tile but there are even extreme sizes of 256x256 pixels.
0-tile... there are parts in the map that don't contain a certain graphic portion. These areas are considered to be empty. The tile map uses a special empty tile for this, the 0-tile. It is the first tile of the tile set.
tile set/tile library/tile sheet... collection of all tiles that can be used to build a tile map. With legit systems a certain number of tiles may not be exceeded because of hardware limitations, e.g. Gameboy DS/Advance, C64.
tile map... a rectangular area defining the world that is to be built out of the tiles in the tile set. Every entry in the map points to a tile in the tile set. Optionally there may be mirror setting so that a tile of the library may be placed in the map with normal orientation or mirrored at x- and/or y-axis. This is supported by some hardware to save memory, because graphics are often symmetric. It also makes sense if your game design just wants to use symmetric tiles. This way you draw them once and use them with different orientations. Modifying the single main instance will also update all others automatically.
Primer topics:
Creating a new Tile Map Project
Tile mapping control panel
General usage and behavior Create a Tile Set (only) for using with a game engine
Use an existing tile set
Join multiple tile sets into one
Extract tiles from any image
Object containers
Sketch to tiles
Tile Animations
Extended modify/create workflows
Creating a new Tile Map Project
There are two ways to create a tile map project. You can either create a fresh new project using menu File/New Project or you can turn already existing bitmaps into a tile map project using menu Tile Mapping/Turn Project into Tile Maps.A tile map project uses every frame as a single tile map. A single project can have X tile maps of the same size.
Layers can be used to define foregrounds and backgrounds.
New Project
When creating a complete new project you must set the project type to be Tile Maps. Then you can define the map size (in tiles) and whether to use tile mirrors into horizontal or vertical direction.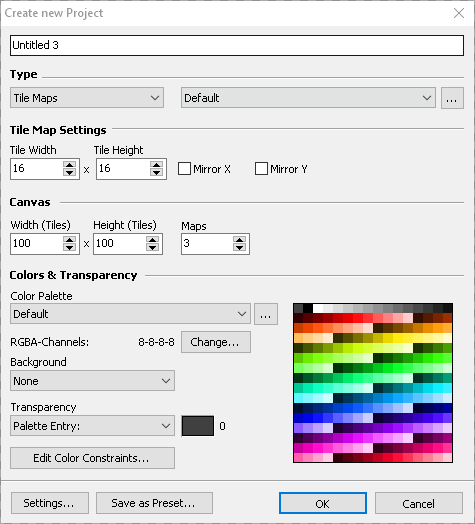
Create from Image(s)
If you have already created graphics that are to be turned into tile maps and a tile set then you can load the image/animation and use menu Tile Mapping/Turn Project into Tile Maps.A special dialog appears where you can define the size of the tiles.
Tile Mapping Control Panel
As soon as you have a tile map project active then the corresponding tile mapping data panel at the top right of the main form is activated:
It provides a couple of functions which will be described in detail later.
At the bottom of the canvas window additional information about the tile under the cursor is given.
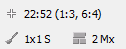
22:52 (1:3, 6:4)... shows the tile coordinate where your mouse pointer is in the map and the in-tile pixel position in brackets.
2 Mx... is the number if the tile in the map where your mouse pinter is. "Mx" means that it's a horizontally mirrored instance.
Pick/Place Tiles... one of the two modes to modify the tile map. This one assumes that your brush contains graphics made up of tiles from the tile set that are to be placed. If your brush does not contain aligned graphics that match tiles then you get a warning when stamping the brush down and the changes are reverted.
Modify/Create Tiles... this drawing mode assumes that you want to modify tiles or create new ones when drawing on areas where there are no tiles placed yet. The options in the selection boxes will support special workflows as described later on.
Create Duplicates... enable this option to create new tiles in connection with "pick/place" mode. If activated then tile copies are created whenever you place a tile somewhere. This way you can easily derive new tile objects from existing ones. Place a copy and then modify it.
Sync Mode... this special option activates the tile detection. If deactivated you can draw into the bitmap without modifying the tile map or the tile set. As soon as you activate this option again the modifications are scanned and transformed into new tiles.
General Usage and Behavior
There are a lot of tile map editors around suitable for every flavour. Each of them has advantages and disadvantages and the one included here has, too.Something that is different to all the other editors is that it's built into a normal paint software and that it does not divide between editing the tile map or the tile by using different work spaces or tool sets.
With other map editors you will often have to separate workspaces. One workspace is used to place tiles of the library in the tile map and the other work place lets you edit single tiles. A disadvantage of this approach is that you hardly see the overall graphics when you edit pixels of a tile. You mostly only see just the tile you edit. But complete objects are made up of a bunch of tiles and seeing just a single one is just like looking through a keyhole.
Within this tile mapping engine you can place tiles of the library as well as edit the tiles in place as if you would draw a bitmap without any tile mapping. But of course there are some things to take care of. At first, you must understand that there are still two edit modes you must choose from, "Pick/Place Tiles" and "Modify/Create Tiles" and they have special tasks as described below.
Also you should prevent permanently duplicated tiles in the tile set. Generally the task of a tile set is to host unique graphics portions to be used to build your level world as a tile map. Having duplicates would mean that you have exactly the same tile more than once. This does not only increase the tile set, it may also lead to confusion generally and to unwanted behavior of the built-in tile map engine.
Having duplicates temporarily because you will finalize them later is of course a proper way.
Modify/create Tiles
This mode is used to create new tiles or to modify existing ones. You can use any drawing tool to modify the image (tile map). There will be basically two cases that are to be processed by the tile map engine after each drawing step: new tiles are created or existing tiles are modified.The engine divides between these cases simply by checking if the modified area contained 0-tiles or not. As soon as you draw on a 0-tile then new tiles must be created for the graphic portion to be added to the tile set. If you draw on existing graphic portions then they are made up of tiles from the library and those tiles are updated accordingly.
At this point you will face the first tile mapping effect. If your tile map contains a tile at different positions then modifying the tile physically at one position in the map will update all other positions, because they use just the same tile. It's the same thing as with modifying a color in the color palette. All pixels using this palette entry will change its color.
If the tile mirror options are enabled in the settings then the engine will add tiles that match the mirror options only once to the tile set. The corresponding tile map entries will then know how to mirror the tile to display correctly.
You will find additional selection boxes right beside the modify/create mode button. They can be used for special workflow as described at Extended modify/create workflows
In short the left selection box defines the behavior when modifying empty space (0-tile):
| Allow new tiles | Just creates new tiles for every 0-tile you touch while drawing. |
| Merge new tiles |
Checks the pixel modifications and only creates new tiles for every unique in-tile modification. If you create a filled rectangle with a single color fully covering x tiles then only a single tile is created and used with all modified positions in the tile map. |
| Reuse matching tiles |
Checks the pixel modifications and creates new tiles if the tile set does not have a matching tile yet. If there are matching tiles in the tile set, those are placed instead creating new ones. |
The right selection box defines the behavior when modifying an existing tile on the canvas.
| Modify existing tiles | Directly changes the tile contents. |
| Auto place matching tiles | If you place a graphic portion that exactly matches an existing tile then the tile on the canvas is replaced by the one that has been found in the tile set. It's a kind of tile place mode. |
| Duplicate & modify tiles |
A copy of the modified tiles on the canvas is created and the changes are applied at the copy leaving the original tile
unmodified. |
Pick/place Tiles
To extend the tile map by placing more and more graphic objects you use the Pick/Place Tiles mode. This mode assumes that your brush contains aligned graphic data that is already available in the tile set. If you try to place graphics that can not be found as tiles in the library then they won't be placed. A warning would be displayed in that case.When the place mode is activated then a snap grid will be switched on automatically to ensure that the tiles are placed at the correct positions. You can use the brush pickup tool now to pick up image portions right from the canvas and place it somewhere else.
If you select a tile from the tile set window then this mode is activated automatically if you did not change this behavior in the settings area of the Tile Set Window.
In some cases it is useful to place tiles but to create copies in the library. For example, you want to create new objects based on existing ones. To create duplicate tiles just activate the Create Duplicates option. As soon as this is activated every tile that is placed will create a new tile in the library even if there is already such a tile.
Please note: When you place tiles then the engine will primarily work on modified pixels. That means it checks for modified pixels and tries to find the first, best matching tile in the tile set and use its tile index. Because a tile set should not permanently have duplicates, this will lead to a desired result. But if you have duplicates in your tile set then it is probably not what you want.
If you create temporary duplicates, and you want to place exactly those on the canvas then select them as single tiles, either by picking them up from the canvas as single tile or selecting it in the tile set window. When you now place exactly this single tile somewhere the index is copied as well.
Sync Mode
To have correct tile map projects every tile map must use graphic data from the tile set. As soon as there would be graphics that can not be rendered using a tile of the library then the graphics would be out of sync and useless for any tile map based game engine.That's why the tile map engine scans for modifications after every drawing step, adding new tiles, updating the map entries with tile indexes of the library etc. to keep everything in sync.
In certain cases it is useful to deactivate the synchronisation to work without having the tile engine to check and process, for example if you want to create new objects freely. When creating new graphic portions then you will have areas that contain the same pixel data from time to time, e.g. just a single color. If the sync mode was enabled then the engine would create a single tile in the library as soon as you e.g. draw a filled rectangle. Now you want to add details to the single color area and immediately the details would be propagated to all other tiles in the map where the single color was used.
To prevent this you should switch off the Sync Mode. You can then draw freely whatever you want without having the engine to optimize or check anything. As soon as you are done just activate the sync mode and the engine will scan through the changes, updating, adding or reusing tiles so that everything is in sync again.
Tile Set Window
The tile set window shows all tiles of the set in their given order.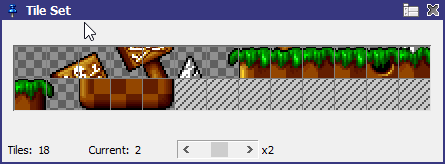
You can select a single tile there to place it into the map as well as shifting it around in the tile library. For a detailed description look here.
To select and place tiles it is handy to just pick up graphic portions from the map using the brush grab tools along with the Pick/Place mode instead of using this window. When picking up from the tile map you can pick up complete objects to place them, not only single tiles!
Use this window primarily to manage your tiles, duplicates etc. Click with you right mouse button on a tile to find context specific functions such as duplicate tiles, insert empty, remove, join duplicates etc. .
If you create a type of tile map that indeed only has objects made from single tiles and not ones that are made of a couple of tiles then it's okay to stick with this window for tile selection. You can even use the mouse wheel control to quickly navigate through the tiles. But if you have mainly larger, multi tile objects then you should use an arranged tile set as described later.
Different Map Sizes
Because Pro Motion is an animation software where every frame must have the same size, also all maps in a single project will have the same size. For games, you could need to define maps of completely different sizes by using the same set of tiles, e.g. for different level size formats.One way is just to always use a very large overall map size and align your levels to the top left. You can limit the map size in your game engine as required.
If you really need limited and precisely defined map sizes then you can define a couple of projects and connect them as tile maps sharing the same tile set. This is done using the Tile Mapping/Manage connected Projects dialog.
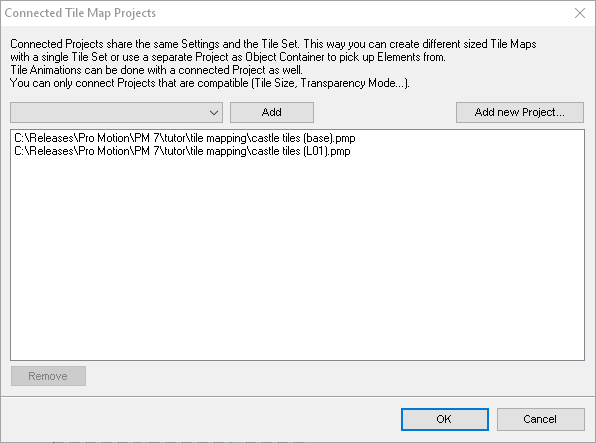
You can attach more than one project. As soon as the tile set is modified it is copied to all attached projects. You can even load every project independently, but as long as not all connected projects are loaded, you can not modify the tile set.
Tile Map Layers
With games the level worlds are often defined by different (tile map) layers. There is one for the grounds/platforms, one for the parallax background screen and one for the foreground partly covering the game characters: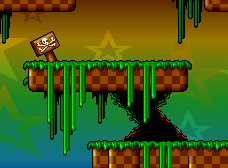
For this you can use the layer engine that you always use when drawing multi layered images or animations. Every layer can contain different tile maps.
Please have a look at the layer primer to get some basics if you haven't used layers before.
Optimization
To optimize the tile set there a some optimization functions in the menu Tile Mapping. These functions help to remove duplicates or empty tiles as well as optimize concerning the mirror options.Data Export
This is a topic that won't probably satisfy every user since there are too much different needs for different projects. We have tried to create an export system that is dynamic enough to cover most needs.To export the tile mapping data please use the corresponding menu entry in the menu tile mapping.
It will lead to this dialog where you can set up different options to export data.
There are some internal file types like map or tile set files. They are explained in detail at the tech info pages.
Workflow showcases and tips
Create a Tile Set (only) for using with a game engine
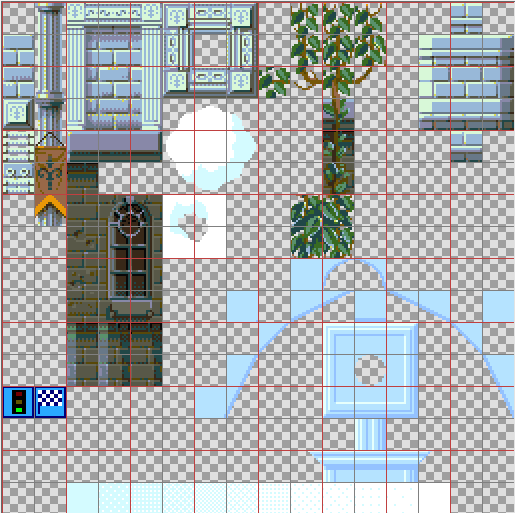
As said before game engines often have their own set of tile mapping tools which are optimized for the respective engine and their options. That means an important use case is just to create a tile set (or a couple of) and export it to the game engine to create maps, refine the tile set and update it in the game engine without destroying existing maps.For this approach it is important to have a tile set or tile sheet that you can easily use as a tile set image in your game engine. There you typically select your tiles from that sheet and apply it to the map. The "linear" order of the tiles as it is seen in the tile window is not suitable for this, so we need to create an arranged tile set image that serves for this purpose instead of trying to puzzle the tiles around in the tile set window.
Based on this arranged tile set image you create level maps in Pro Motion NG just to play around with your tiles. The maps created are just playgrounds to extend and modify your tile set and not to import the maps to a game engine.
You can even start with an existing tile set image you created before and that you already used it with your game engine project.
The key is to use connected projects. You can connect multiple tile projects using menu Tile Mapping/Manage connected Projects. Connected projects means that all share the same tile set and if you modify the tile set all places of the tiles in all maps of all connected projects are automatically updated. You can directly create a new project in this settings dialog or attach existing projects.
This way we can use one project that serves as an arranged tile set and the other project(s) serve as tile maps to test the tile set and refine it. In the project with the arranged tile set you only need to place all tiles that you have in a way you want to use it in your game engine to create the real level maps.
Download the sample project simple_arranged_tile_map_sample.zip and unzip its contents to a folder of your choice and load one of the contained project files.
Project "castle tiles (arranged).pmp" is the arranged tile set area, and it looks like this:
Project "castle tiles (test maps).pmp" contains multi layered test maps to check tile set behavior and to refine tiles.
Create new tiles anywhere, but be sure to add new tiles also to the arranged tile set area. To import the tile set to your game engine you only need to save this image as an image file, e.g. "castle tiles (arranged).png" and load it into the tile set space of your game engine.
Important: once you created some tile maps in your game engine environment you may never change the width of the arranged tile set project! This is because the game engine will give every tile a number, starting with e.g. "1" at the top left of the image. If the width of the image is 10 tiles then the first tile of the second row is 11. A tile map points to the tiles by these numbers (indices). When you now change the width of this image to, e.g. 20 then tile 11 is not to first one in the second row, it's tile 21 and so your map would address wrong tiles.
You can typically increase the vertical size, but it is a good practice to first think about how many tiles and objects you will probably need in the arranged tile set and/or to check which size is good to handle in the tile map editor of your engine to define a useful initial tile set width.
Use an existing tile set
If you have already a tile set that you created with some other art software then just load it as an image file. Then use menu Tile Mapping/Turn Project into Tile Maps.... Enter the tile size and mirror options. Once it is turned into a tile map project you can add connected projects using Tile Mapping/Manage connected Projects as described in Create a Tile Set (only) for using with a game engine.Join multiple tile sets into one
Sometimes you have a couple of tile sets you want to join and this raises two main problems:- joining color palette
- joining tile set image contents
If they have different color palettes then you must use menu Colors/Reduce Colors... and create a single color palette that is used with all frames. Alternatively use the "G" sign in the Layers Window.
Once all frames share the same colors you can resize this project to make it large enough to hold all the tiles you want using menu Frame/Resize.... Then just place all tiles you need to the first frame as required using the Pick/place mode. To have all tiles it can make sense to just pick up complete frames and just place them above each other. You might want to change the brush handle position to be top left for easier placement, see menu Brush/Grip/Top left... or just hit Alt + X.
When done you can remove the frames that you don't need anymore and use the joined tile set.
Extract tiles from any image
Assuming you have one or multiple images that use tiles, e.g. a series of level map images from legacy projects or screenshots.To extract unique tiles from such images just create a new tile map project that has the correct tile size. Then use menu Tile Mapping/Import Tiles... and load every image one by one. Select appropriate options to append tiles and to handle colors.
Another approach is just to load the bitmap containing tiles as a brush, import the colors from there (see menu Brush) and stamp the brush down in Modify/create mode to let the system generate the tiles in the tile set.
Object containers
Use the brush container to store complete objects for easy reuse. Then you won't need to pickup them from the screen all the time. But those objects must be updated manually if you change the corresponding tile graphics.Alternatively create and attach a connected project with menu Tile Mapping/Manage connected Projects that just serves as container for all the objects you want to use. Give it one or more tile maps and place a couple of freely arranged objects there built from tiles. It could contain categorized objects per map (frame) like houses, plants, platforms, backgrounds, clouds etc. for you to pick up. Because it's tile maps changes to tiles will update there as well.
Sketch to tiles
When you start to create a tile map then you could draw a bitmap first without the tile mapping enabled that defines a representative part of the world as a base. Turn this bitmap into a tile map by using the corresponding function of the menu tile mapping. This starting project may then also define objects for different layers on different frames or layers so that you can divide between foreground and background objects.Whenever you want to continue sketching in the tile map enabled project then deactivate the Sync Mode. Then you can draw freely without creating tiles. When you are done sketching activate the sync mode again to let the engine generate new tiles.
Tile animations
If you want to create a tile animation then you can attach a tile map project that has the map size of the object or tile you want to animate.Now create as many frames (=maps) as you need for the animation and place the tiles there that you want to animate. Typically, you will add the initial object into the first frame and then create copies of the object/tiles in subsequent frames using the duplicate mode. Now you can animate the object/tile easily and the different animation stages are separate tiles in the tile set. The Witch Walk Tiles Sample contains an animation made of 2x2 tiles.
Extended modify/create options
As described the typical usage is to divide between pick/place tiles and modify/create. There might be reasons to prefer staying in the modify/create mode while still placing tile data and tweaking them. For this there are a couple of options that support you to optimize your workflow.As described above the modify/create mode has a couple of extra options.
Although these options are selection boxes most of the functions are mostly used temporarily, so you either need to toggle them quickly or you even only want them to activate only when a key is held.
That's why you should assign your individual keyboard shortcuts to those functions. By default, they are undefined:
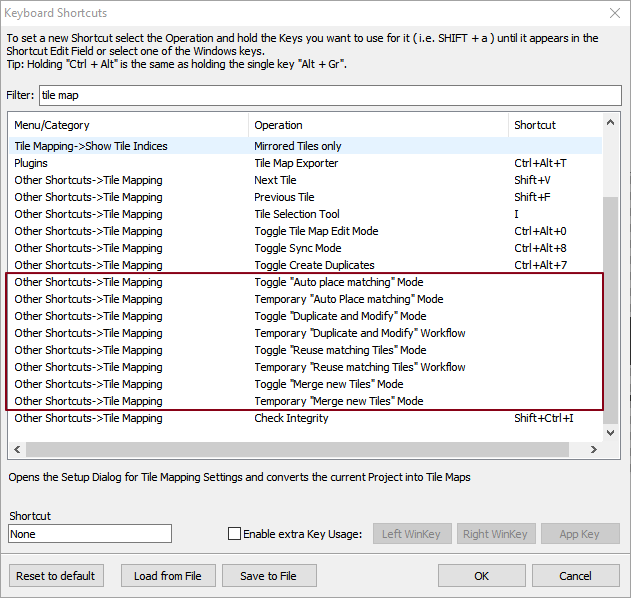
With these you can quickly toggle a mode or temporary activate it by holding the corresponding key combination. Also, you should deactivate Auto activate Tile Placement option in the tile set window. Otherwise, it will jump to pick/place mode whenever you select a tile there.
Related topics
Import ColorsExport Tile Set
Contents
Menu Tile Mapping
Menu Options
New Project
Pattern Draw Primer
Project Preset Edit
Tile Mapping Data Export
Tile Set
Workspace
Last modified: 29 January 2023